Happy Fractal Holidays!
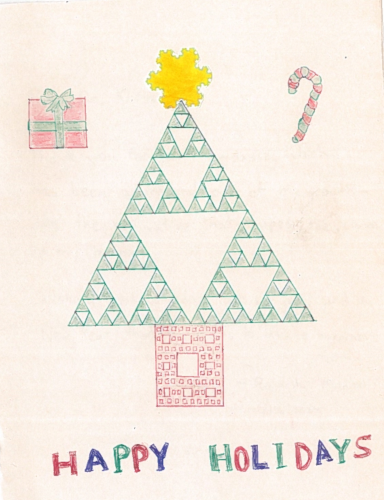
Take a look at a card one of my students gave me last December. You can spot the Koch snowflake, the Sierpiński triangle, and the Sierpiński carpet on it. I guess my fractal class was a hit.
Share:
Mathematics, applications of mathematics to life in general, and my life as a mathematician.
Archive for the ‘Math and Art’ Category.
Take a look at a card one of my students gave me last December. You can spot the Koch snowflake, the Sierpiński triangle, and the Sierpiński carpet on it. I guess my fractal class was a hit.
Foams are a recent craze in homology theory. I want to explain what a foam is using a tesseract as an example. Specifically, the 2D skeleton of a tesseract is a foam.
We can view a tesseract as a convex hull of 16 points in 4D space with coordinates that are either 0 or 1. The edges connect two vertices with the same three out of four coordinates. Faces are squares with corners being four vertices that all share two out of four coordinates.
Foam definition. A foam is a finite 2-dimensional CW-complex. Each point’s neighborhood must be homeomorphic to one of the three objects below.
My favorite example of a foam is a tesseract. Or, more precisely, the set of tesseract’s vertices, edges, and faces form a foam.
Some of the coolest foams are tricolorable. A foam is called tricolorable if we can color it using three colors in such a way that each face has its own color, and any three faces that meet at a seam are three distinct colors.
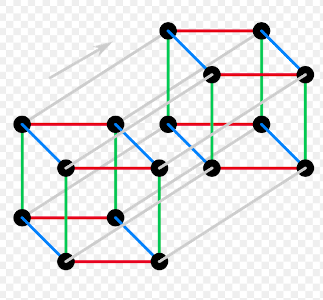
Not surprisingly, I chose a tricolorable foam for our example. Let me prove that the tesseract’s 2D skeleton is tricolorable. We start by coloring the edges in four colors depending on the direction: red, green, blue, or gray, as in the first picture (source: Wikipedia). Each face has two pairs of edges of two different colors. We can color the faces in the following manner: if none of the edges are gray, then the face color is the complementary non-gray color (For example, if the edges are red and blue, the face is green). If the edges are gray and one other color, then the face color matches the non-gray color (For example, if the edges are red and gray, the face is red). I leave it to the reader to prove that this coloring means that each edge is the meeting point of three different face colors.
Here is an interesting property of tricolorable foams. It is Proposition 2.2 in the paper Foam Evaluation and Kronheimer-Mrowka Theories, by Mikhail Khovanov and Louis-Hardien Robert.
Proposition. If we remove the regular points of one particular color from a tricolored foam, we will get a closed compact surface containing all the seam points and singular vertices.
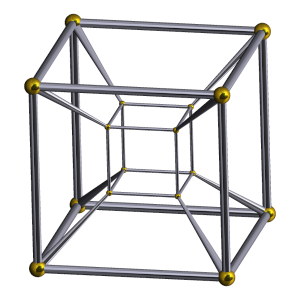
In our example, the result is a torus, which you can recognize in the second picture. Here, I use the Schlegel diagram as a model for a tesseract, shown on the right (source: Wikipedia). The exercise for the reader is to explain where the eight green faces of the torus were before they were removed.
The following lemma from the aforementioned paper describes another cool property of a tricolorable foam.
Lemma. If a foam is tricolorable, its 1D skeleton (the graph formed by seams and singular points) is bipartite.
And, surely, I am leaving it up to the reader to check that the tesseract’s 1D skeleton forms a bipartite graph.
I deleted my previous post about Solomon’s knot. The reason is simple. I made the mistake of trusting Wikipedia. I was sure that the linking number of Solomon’s knot was 2. Then Wikipedia said it was 0, so I fixed “the error” in my post. One of my readers corrected me. So, I rechecked it, removed my post, and fixed the article in Wikipedia. Now, I have a new post about the knot.
Solomon’s knot is actually not a knot in a mathematical sense. It is a link because it consists of two loops. It is famous for being one of the simplest linked links. The simplest one is the unlink, the link where two loops are not linked. The next simplest is the Hopf link. The Solomon’s knot is the next after that.
Usually, the simplicity of a link corresponds to its crossing number, which is the smallest number of crossings of a projection of the link onto a plane. The unlink has a crossing number of 0, the Hopf link has a crossing number of 2, and the Solomon’s knot has a crossing number of 4. However, the linking number created the confusion, so I will explain it.
The linking number is an invariant of a link, which describes how many times one loop goes around the other. It equals zero for the unlink, one for a Hopf link, and two for Solmon’s knot.
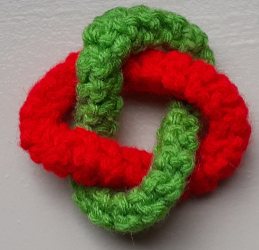
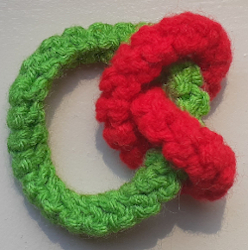
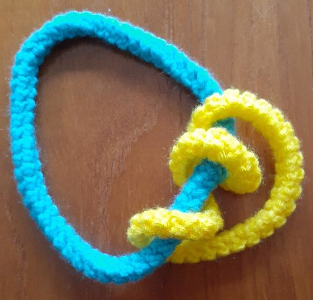
I often have difficulty calculating the linking number by looking at a picture of a link. This is why I started to crochet links: finding their linking numbers by fiddling with them is easy. The first image shows the crocheted standard representation of Solomon’s link. The second image shows the same link, but I slid the red loop so it twists around a small portion of the green loop, which now looks like a segment. Then, I can count the number of times the red loop goes around the green segment. What’s important is to keep the direction in mind. In the second picture, one can see that the red loop winds around the green loop twice but in the same direction, making the linking number two.
So far, it looks like the linking number grows with the crossing number. Here is where my favorite link, the Whitehead link, comes in. It breaks the previous pattern. It has the crossing number of 5, so it is slightly more complex than Solomon’s link. But its linking number is zero, which is unusual for a linked link. In fact, the Whitehead link is the simplest linked link with the linking number zero, but I already wrote about it in my post Whitehead Links for Ukraine.
The Museum of Mathematics organizes a biannual conference in recreational mathematics called MOVES: Mathematics Of Various Entertaining Subjects. Being a math-recreatinalist myself, I attend all of them. The last one was held in August 2023 and was devoted to the mathematics of Fiber Arts. A few years ago, I wouldn’t have believed I had something to do with the arts. However, in recent years, I started crocheting mathematical objects for my classes, so I not only decided to attend, but also submitted a talk proposal.
The talk proposal was accepted. And, when I finished my slides, I realized that I created too many objects for a 25-minute talk. So, I divided my talk into seven sections and asked the audience to choose. I was lucky that they chose what I was most excited about, but I only had time to cover 4 out of 7 section.
Today I am posting a couple of pictures from my slides that showcase Brunnian links.
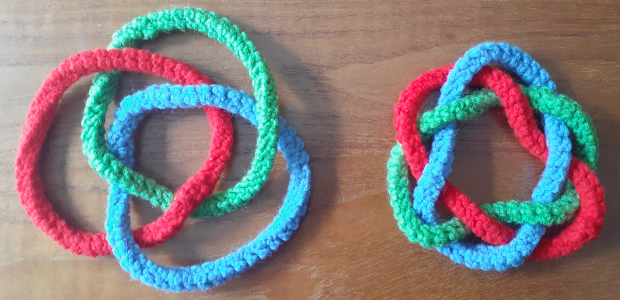
A Brunnian link is a set of loops that can’t be separated, but if any one loop is removed, they all fall apart. The most famous example of a Brunnian link is Borromean rings which I already wrote about. In the first picture, the Borromean rings are on the right. They are famous because they are the simplest Brunnian link.
There are two natural ways to generalize Borromean rings. One way is to use the same three loops, but make them twist around each other more. The second way is to increase the number of loops.
The left side of the first picture shows three tangled loops, which are more intertwined than Borromean rings. The crossing number of the link on the left is 12, while the crossing number of the Borromean rings is 6.
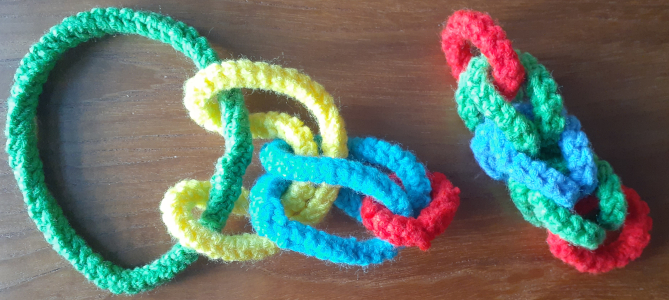
The second picture shows two Brunnian links with more than three loops. The left link has four loops, while the right link has five.
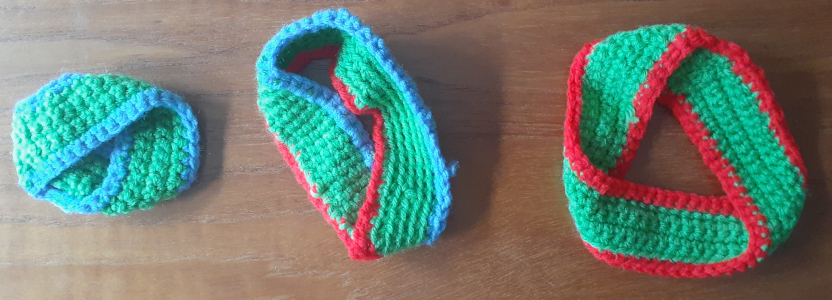
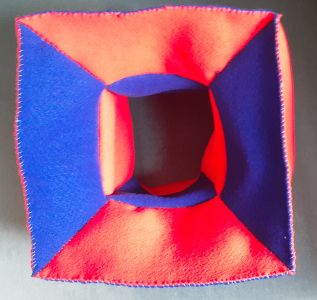
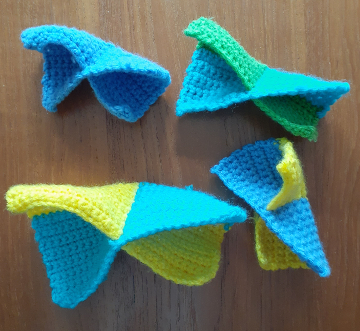
Why would I complicate my life by crocheting colored borders onto different strips?
Answer: I wanted to emphasize their borders.
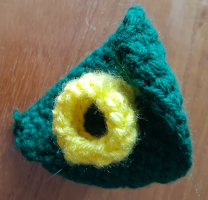
Do you recognize the objects in the picture? The leftmost one is a Möbius strip. I made it by crocheting a long rectangle. Then, instead of connecting the short sides to form a cylinder, I twisted one side 180 degrees before stitching them together. For the other two objects, I made 360 and 540 degree twists, respectively.
I used green yarn for the internal part of the strips. When the twist in the strip is a multiple of 360 degrees, the resulting surface is orientable and has two borders. I used two different colors to emphasize this fact. In other cases, the resulting surface is not orientable and has only one border, so I only used one color for the border.
The point of using extra colors for the borders is to make them more prominent. For example, it is easy to see that the Möbius strip’s border is a circle. The border of the piece in the middle consists of two loops, and the different colors make it obvious that the two borders are linked. The last object has one border, and the color helps you notice that its border is a trefoil knot!
What would happen with the borders if we increase the number of degrees in a twist? Can you figure it out? Are you willing to take up crocheting to solve this puzzle?
Share: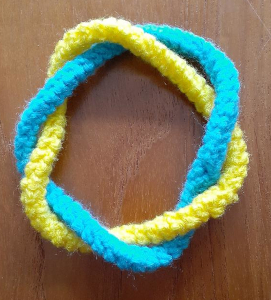
A link is defined as two closed curves in three-dimensional space. The first picture shows an example of a link with one yellow curve and one blue. The linking number is a simple numerical invariant of a link. Intuitively, it represents the number of times that each curve winds around the other. For example, if it is possible to pull the two curves apart, the linking number is zero.
When I studied the linking number, I would look at a picture of a link trying to calculate this number. It was confusing. It only became easy after I started crocheting. For example, the second picture shows the same link as the first but slightly rearranged. I simply slid the yellow loop along the blue one until I could clearly see a piece of the blue loop as a straight segment and the yellow loop circling around it. Now, it is easy to see that the yellow loop winds around the blue one 3 times, making the linking number 3.
The only thing to remember is that while counting the number of windings, I need to consider the direction. It is possible for a loop to wind clockwise and then counterclockwise. In this case, the linking number is the difference between the two.
I crocheted a lot of links, and now my students and I have no problem calculating the linking numbers.
After I crocheted Whitney Umbrellas, I got excited that I figured out how to crochet through an existing layer of fabric. I decided to use my skills to crochet “correct-er” Klein bottles.
A Klein bottle is a cool mathematical surface with only one side, similar to the Möbius strip. Unlike the strip, the Klein bottle has no border making it a non-orientable manifold. The problem in making Klein bottles is that the Klein bottle can’t be embedded into 3D space. Thus, all 3D models of Klein bottles have to self-intersect. But all the models that I saw, including glass models and crocheted hats that you can buy at ACME Klein Bottle, have holes.
I realized that my method of crocheting through might allow me to make more accurate models of Klein bottles, ones without holes.
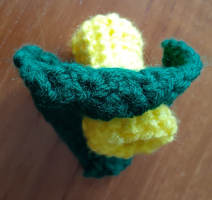
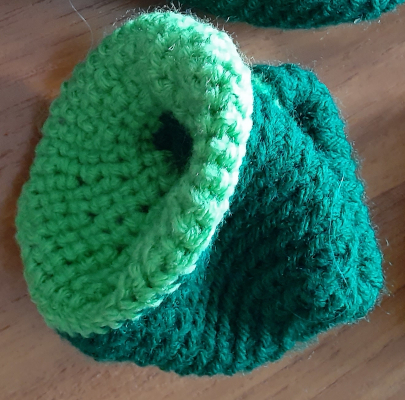
Now it is time to spill my secret. The idea is easy, the implementation is not. The two pictures show the same yellow cylinder crocheted through a green square, viewed from different angles. I crocheted the green square first, then half of the yellow cylinder. Afterwards, I had to pull the whole ball of yellow yarn through a tiny hole in the middle of the green square. Then, with my hook, I pulled each yellow stitch from one side of the green square to the other side through its own tiny hole and finished the stitch on the new side. In the third picture, you can see my Klein bottle made in two colors. You might be able to see the second color inside instead of a hole.
I invented this method while crocheting Whitney’s umbrellas. I had to pull the whole ball of yarn through a tiny hole once per row. I still remember the tediousness of it with dread.
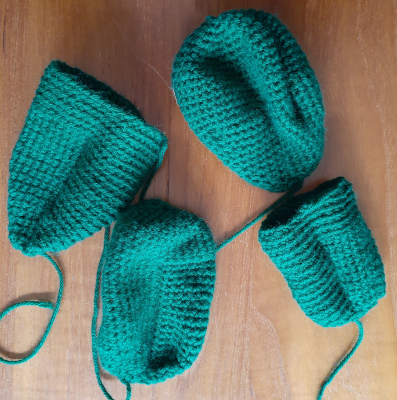
After the bottles, I decided to try projective planes. In the fourth picture, you can see two projective planes and two projective planes with holes. For the former, I started with the bottom hemispheres, and for the latter with cylinders. I didn’t need to crochet through or pull yarns through tiny holes. I just crocheted one row across the other. I left the easiest crochet task for last!
I use Escher’s tessellations to teach wallpaper groups. Escher is the best painter among mathematicians and the best mathematician among painters. His fame helps energize my class. Plus, he has so many beautiful drawings to choose from.
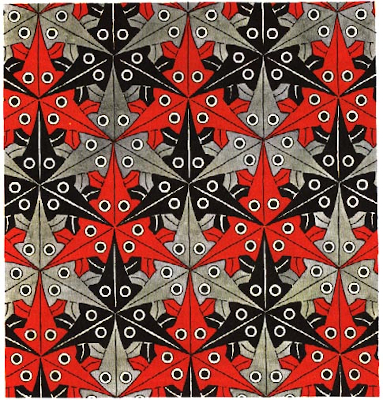
However, there is another layer to his tessellations. Many paintings are not just a study in wallpaper groups but also in group-subgroup pairs. For example, consider these red/gray/black fishes on the left. There are three distinct points where three different reflection lines intersect. The first point is where three black fishes kiss each other. The other two points correspond to gray and red fish kisses. In orbifold notation, this symmetry group is *333.
But, the same drawing has another symmetry group. We just need to ignore color. That is, we consider all the fishes to be the same. In this case, our three distinct points where three reflection lines intersect become the same point: the point where fishes kiss, regardless of their color. The new symmetry group has an additional element: a 120-degree rotation where three fins of three different-colored fishes touch each other. Thus, the new symmetry group is 3*3.
Escher created a lot of examples of groups and their subgroups using color. But, sometimes, he was more subtle. In one of my previous posts, The Dark Secret of Escher’s Shells, I discussed my favorite Escher’s plane tessellation. In that drawing, the second group appears when we ignore the markings on one of the dark shells.
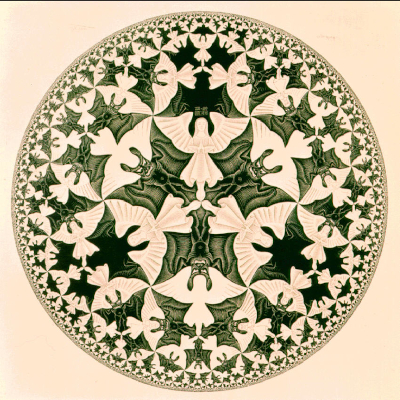
Here is another spectacular example of a group and subgroup, a tessellation of a hyperbolic plane with angels and devils. Do you see two different symmetry groups in the painting?
A Whitney umbrella is a cool surface I wanted to crochet. The umbrella continues to infinity, and there is no way I want to crochet the whole thing. I wanted to make a finite portion of a Whitney umbrella surrounding the most exciting point.
The result is seen in the picture. Technically, I crocheted not Whitney umbrellas but topologically equivalent surfaces. I am most proud of my secret — and painful — method of crocheting the self-intersecting segment. One day I will spill it.
As Wikipedia defines it: the Whitney umbrella is the union of all straight lines that pass through points of a fixed parabola and are perpendicular to a fixed straight line parallel to the parabola’s axis and lies on its perpendicular bisecting plane. If you look at the picture, the fixed straight line is the self-intersection line, which is a continuation of the line segment where the colors are woven through each other. You can find the parabola as the curve formed by the two-colored edge on either side of the umbrella. Oops, I forgot that only three of these umbrellas are made of two colors.
The Whitney umbrella is a ruled surface, meaning that for every point, there is a straight line on the surface that passes through the point. A ruled surface can be visually described as the set of points swept by a moving straight line.
Oh, look, the stitched rows can pretend to be these straight lines. Actually, if I fold these thingies, the stitched rows ARE straight lines. But, when I make the edges into parabolas, the rows stop being straight. In the real Whitney umbrella, if you look along the intersection line, the straight lines are closer to each other than they are along the parabola. But in crochets, the distances between rows have to be fixed. If my crochets are folded, they become rectangles and ruled surfaces. The real Whitney umbrella does not fold into a plane.
The Whitney umbrella is famous for being the only stable singularity of mappings from R2 to R3. I am grateful to Paul Seidel for emailing me the proof. This singularity is so famous it even has two names: pinch point and cuspidal point. Though my crochets are not exactly Whitney umbrellas, they show this singularity. Hooray! I found a secret way to crochet the most famous stable singularity!
Share: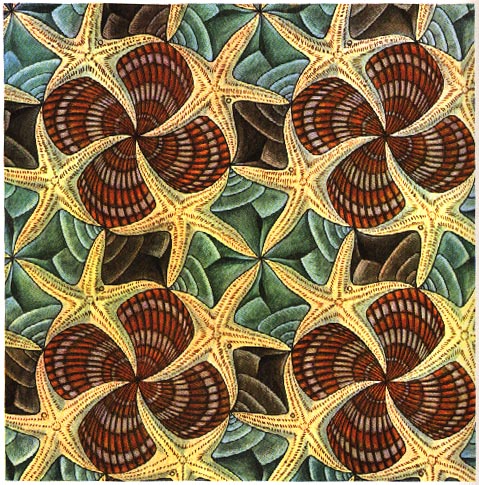
My favorite of the Escher plane tessellations is the one with shells. It is stunning, and the mathematics behind it is beautiful. I want to thank the late John Conway for teaching me the secret of this drawing.
Mathematicians are interested in tessellations because of the symmetries behind them. This tessellation has translational and rotational symmetries. Can you find them?
When I ask my students to find the rotational symmetries, they immediately tell me that they see two different 4-fold points, aka points where 90-degree rotations preserve the drawing. One point, I call G, is where four greenish shells meet, and one point, I call R, is where four reddish shells meet.
As you might have guessed, the students’ answer is not quite correct. There is more to the picture. Look at a dark-brown shell that looks like a curvy rectangle. This shape has markings. Now look at a specific point R and its four closest brown shells. You can see that going around this point R, the brown shells alternate their orientation: the darker side of these shells either faces towards point R or away.
The big secret of this artwork is that it contains TWO symmetry groups: a group and a subgroup. If we ignore the markings on the brown shells and consider them one solid color, then point R is indeed a 4-fold symmetry point. In addition, the center of the brown shape is a 2-fold symmetry point. Thus, the symmetry group of this simplified drawing is 442 in orbifold notation.
If we take the markings of the brown shells into account, then point R is not a 4-fold rotation, it is a 2-fold rotation. Point G keeps the property of being a 4-fold rotation. If you know your symmetry groups, you can conclude that there should be another 4-fold rotation. But where is it?
I will spill my answer. The symmetry point G is not ONE symmetry point anymore. There are two different points where greenish shells meet. The dark side of the brown shells faces one of them and looks away from the other.
The dark secret of this drawing is that it demonstrates two symmetry groups: group 442 and its subgroup 442, with different fundamental regions. To see the secret, you must look closely at a dark brown shell and find its darker side.
Share: